How to Check App Permissions on iPhone: Step-by-Step Security Audit
Your iPhone asks for permission before apps access sensitive data. You tap Allow because the app won't work otherwise, or because the prompt appeared mid-task and you wanted to keep moving. Six months later, you have no idea which apps can see your location, read your contacts, or use your microphone.
App permissions accumulate. A fitness tracker needs location access to map your runs. A photo editing app needs camera access to take pictures. A meditation app requests microphone access for reasons that aren't immediately clear. Each permission makes sense in isolation. Together, they create a sprawling access map you've never reviewed.
This is the practical guide to auditing app permissions on iPhone. You'll walk through every permission category, see which apps have access, understand what each permission actually allows, and decide what to revoke. The process takes around 15 minutes. You'll finish knowing exactly what each app can see.
Why App Permissions Matter
Apps request permissions to function, but they also request permissions they don't strictly need. A flashlight app doesn't need your location. A calculator doesn't need your contacts. A game doesn't need access to your photos. Yet all three might ask anyway.
CISA's mobile device security guidance recommends reviewing permissions as part of routine device hygiene. Apps with unnecessary access create exposure. Location data reveals where you live and work. Contact access exposes your network. Photo access includes metadata showing when and where each image was taken. Microphone access allows background listening if the app is compromised or poorly designed.
Permission creep is gradual. You install an app, grant the permissions it needs, use it for a while, then forget about it. The app continues running with those permissions indefinitely. Meanwhile, you install more apps, grant more permissions, and the access map grows. A year later, dozens of apps hold permissions you don't remember granting.
The risk isn't that Apple's permission system is broken. The risk is that you've granted access without tracking what you approved. An audit brings that access back into view.
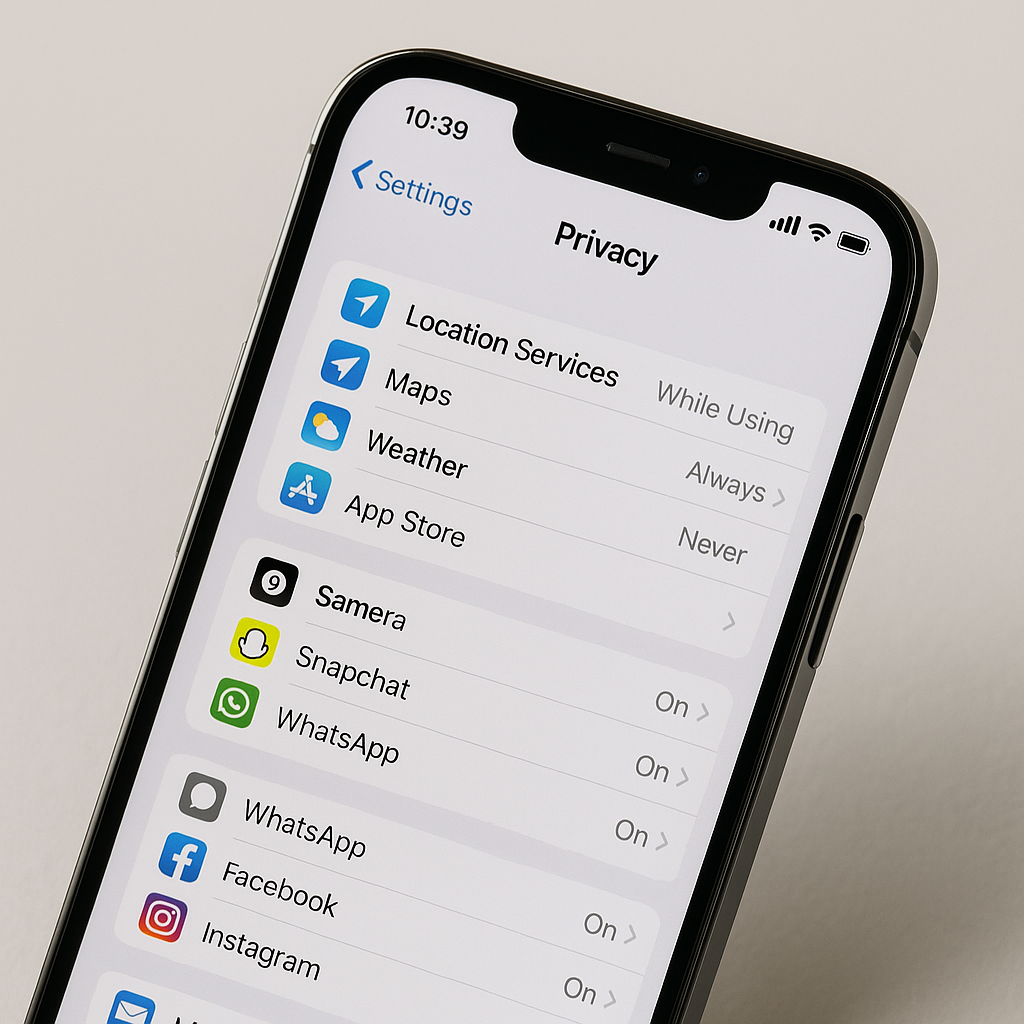
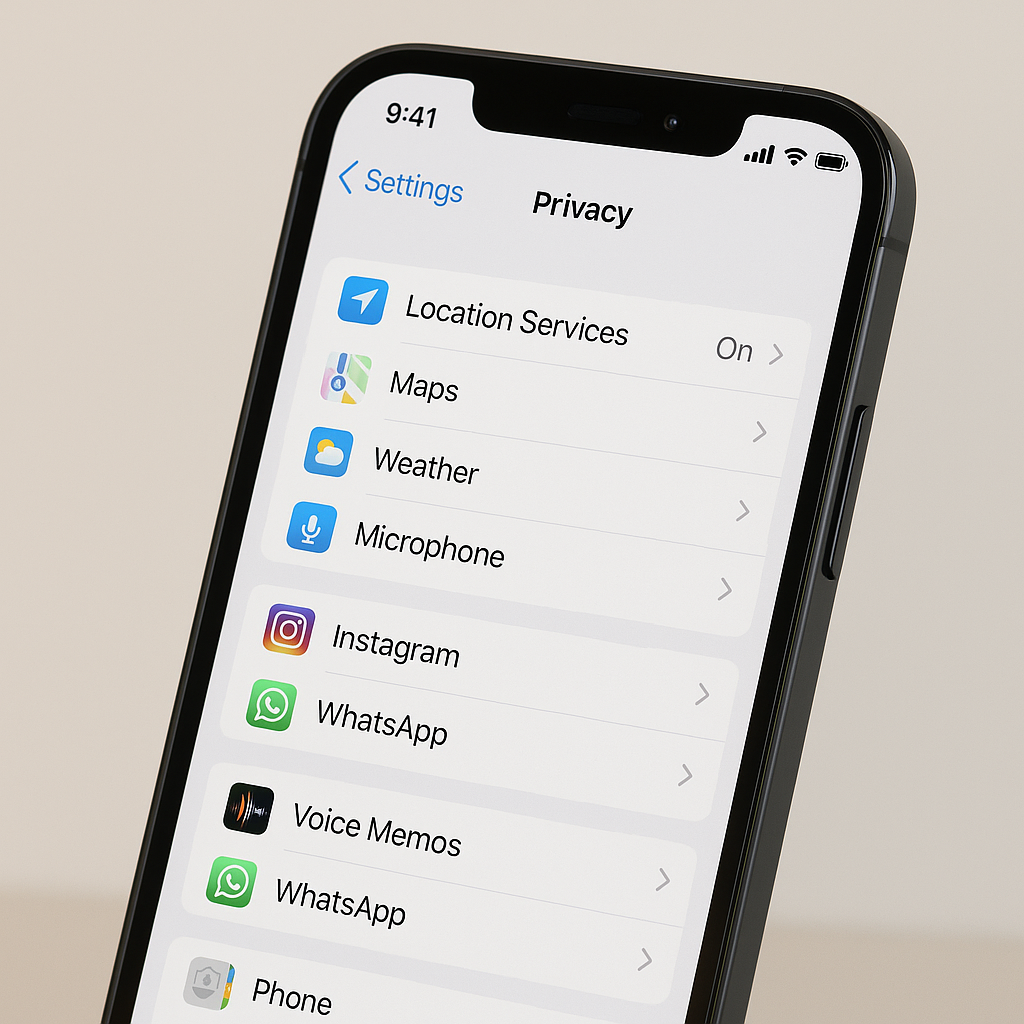
Step 1: Open Privacy & Security Settings
Unlock your iPhone. Open the Settings app. Scroll down until you see Privacy & Security. Tap it.
You're now looking at a list of permission categories. Each category represents a type of data or hardware feature apps can request access to. The categories include:
- Location Services
- Contacts
- Calendars
- Reminders
- Photos
- Bluetooth
- Microphone
- Speech Recognition
- Camera
- Health
- HomeKit
- Media & Apple Music
- Files and Folders
- Motion & Fitness
- Focus
- Tracking
Each category contains a list of apps that have requested access. Some apps appear in multiple categories because they've requested multiple permissions. Your job is to walk through each category and evaluate whether the apps listed actually need that access.
Step 2: Audit Location Services First
Location Services is the most revealing permission category. It shows where you go, when you go there, and how long you stay. Apps use location data for navigation, local search, weather, fitness tracking, and targeted advertising.
Tap Location Services at the top of the Privacy & Security menu. You'll see a toggle at the top that enables or disables location access entirely. Leave it on unless you want to disable location for every app simultaneously.
Below the toggle is a list of every app that has requested location access. Each app shows its current permission level:
- Never: The app cannot access your location under any circumstances.
- Ask Next Time Or When I Share: The app will prompt you each time it needs location access.
- While Using the App: The app can access your location only when you're actively using it. The app icon appears in the status bar when location is active.
- Always: The app can access your location continuously, even when the app is closed or running in the background.
Most apps should be set to While Using the App or Never. Always is appropriate for navigation apps, fitness trackers, and apps that need background location for core functionality. A weather app doesn't need Always. A social media app doesn't need Always. A game doesn't need Always.
Tap each app in the list. You'll see its current permission level and a brief explanation of why the app is requesting location access. Change the permission level if the current setting seems excessive. If you're unsure, switch to Ask Next Time Or When I Share. The app will prompt you the next time it needs location, and you can decide in context.
Scroll to the bottom of the Location Services menu. You'll see System Services. Tap it. This section shows location access for Apple's own services: Find My iPhone, Emergency Calls & SOS, Compass Calibration, Setting Time Zone, and others. Most of these should stay enabled because they support core iPhone functionality. Review them anyway. If you see something unfamiliar, look it up before disabling it.
Step 3: Review Camera and Microphone Permissions
Camera and microphone permissions control which apps can capture images, video, and audio. These permissions are binary: an app either has access or it doesn't. There's no middle ground like While Using the App for location.
Go back to the main Privacy & Security menu. Tap Camera. You'll see a list of every app that has requested camera access. Each app has a toggle. Green means the app can use your camera. Gray means it cannot.
Ask yourself: does this app need the camera to function? A video calling app needs it. A photo editing app needs it. A QR code scanner needs it. A meditation app probably doesn't. A finance app probably doesn't. A game probably doesn't.
Toggle off any app that doesn't have a clear reason to access your camera. The app will still work, but features that require the camera will be disabled. If you toggle off camera access for a QR code scanner, it will prompt you to re-enable the permission the next time you try to scan a code. You can grant it then.
Now go back and tap Microphone. Same process. You'll see a list of apps with microphone access. Each has a toggle. Green means the app can record audio. Gray means it cannot.
Voice memo apps need microphone access. Video calling apps need it. Voice-to-text apps need it. Music identification apps need it. Social media apps request it for video recording and voice messages, which is reasonable if you use those features. Fitness apps request it for reasons that are less clear. Games request it for voice chat, which matters only if you actually use voice chat in that game.
Toggle off microphone access for apps that don't need it. You can always re-enable it later if a feature stops working.
Step 4: Check Contacts, Photos, and Calendars
Contacts, Photos, and Calendars are high-value data categories. Apps request access to integrate with your existing data, but that integration isn't always necessary.
Go back to Privacy & Security. Tap Contacts. You'll see a list of apps with contact access. Each app has a toggle.
Messaging apps need contact access to show you who you're talking to. Email apps need it to autofill addresses. Social media apps request it to find friends already on the platform, but you can use those apps without granting contact access. They'll just require manual friend searches instead of automatic matching.
Toggle off contact access for any app that doesn't need your full contact list to function. If you're unsure, disable it and see what breaks. You can re-enable it if the app becomes unusable.
Now tap Photos. This category is more nuanced than the others. Instead of a simple toggle, each app shows one of these permission levels:
- None: The app cannot access your photos.
- Selected Photos: The app can access only the specific photos you've chosen to share with it.
- All Photos: The app can access your entire photo library.
Selected Photos is the right choice for most apps. A photo editing app doesn't need access to your entire library. It needs access to the specific photo you want to edit. A social media app doesn't need all your photos. It needs access to the ones you want to post.
Tap each app in the Photos list. Change All Photos to Selected Photos unless the app has a legitimate reason to browse your entire library. Cloud backup apps like iCloud Photos need All Photos. Photo management apps need All Photos. Instagram does not.
Finally, tap Calendars. You'll see a list of apps with calendar access. Each has a toggle. Email apps need calendar access to create events from email invitations. Scheduling apps need it to show your availability. Fitness apps request it to log workouts as calendar events, which is a feature you may or may not use.
Toggle off calendar access for apps that don't integrate with your schedule in a meaningful way.
Step 5: Review Bluetooth, Motion & Fitness, and Tracking
These categories are less obvious but still important.
Go back to Privacy & Security. Tap Bluetooth. You'll see a list of apps that have requested Bluetooth access. Fitness trackers need Bluetooth to sync with wearables. Smart home apps need it to control devices. Audio apps need it to connect to wireless headphones and speakers. Games request it for multiplayer features that use local Bluetooth connections.
Toggle off Bluetooth access for apps that don't connect to external devices. If you're not sure, disable it. The app will prompt you to re-enable Bluetooth access if it needs it for a specific feature.
Now tap Motion & Fitness. This category controls access to your iPhone's motion sensors: accelerometer, gyroscope, and step counter. Fitness apps need this data to track movement. Health apps need it to log activity. Games use it for motion controls.
Each app in this list has a toggle. Green means the app can read motion data. Gray means it cannot. Toggle off access for apps that don't track physical activity or use motion controls.
Finally, tap Tracking. This is the category that controls whether apps can track your activity across other companies' apps and websites for advertising purposes. Apple's App Tracking Transparency framework requires apps to ask permission before tracking you.
You'll see a toggle at the top labeled Allow Apps to Request to Track. If this toggle is off, apps cannot ask for tracking permission. If it's on, apps can ask, but you still have to approve each request individually.
Below the toggle is a list of apps that have requested tracking permission. Each app has a toggle showing whether you've allowed or denied tracking. For most people, every toggle in this list should be gray. Tracking enables ad targeting and cross-app data collection. It doesn't improve app functionality.
Step 6: Check Less Common Permission Categories
You've covered the major categories. Now review the less common ones.
Go back to Privacy & Security. Tap Speech Recognition. This category controls which apps can send your voice recordings to Apple's servers for speech-to-text processing. Voice assistants need this. Dictation apps need this. Most other apps don't.
Tap Health. This category controls access to data stored in Apple's Health app: steps, heart rate, sleep, nutrition, and more. Fitness apps need Health access to sync data. Medical apps need it to log health metrics. Social media apps do not.
Tap HomeKit. This category shows apps that control smart home devices. Only smart home apps should appear here.
Tap Media & Apple Music. This category controls access to your Apple Music library and listening history. Music apps need this. Podcast apps might need this. Games do not.
Tap Files and Folders. This category shows apps that can access files stored in iCloud Drive or other cloud storage providers. Cloud storage apps need this. Document editors need this. Most other apps don't.
Tap Reminders. This category shows apps that can read and create reminders. Task management apps need this. Email apps sometimes use this to create reminders from messages. Most apps don't need it.
Tap Focus. This category controls which apps can see your Focus status (Do Not Disturb, Work, Sleep, etc.). Communication apps use this to adjust notifications based on your current Focus mode. Most apps don't need it.
Step 7: Review System Services Location Settings
Go back to Location Services (Privacy & Security > Location Services). Scroll to the bottom and tap System Services again.
This section deserves a second look because it contains location permissions for Apple's own features, not third-party apps. Most of these should stay enabled, but a few are worth reviewing:
-
Significant Locations: This feature tracks places you visit frequently and uses that data to provide personalized suggestions in Maps, Calendar, and Photos. It's encrypted and stored only on your device, but if you're uncomfortable with your iPhone logging your frequent locations, you can disable it. Tap Significant Locations, authenticate with Face ID or your passcode, and toggle it off.
-
iPhone Analytics: This feature sends usage data and location information to Apple to improve products and services. It's anonymized, but you can disable it if you prefer. Toggle it off.
-
Routing & Traffic: This feature sends anonymous location data to Apple to improve Maps traffic information. It doesn't identify you personally, but it does send your location. Toggle it off if you'd rather not contribute.
-
Improve Maps: Similar to Routing & Traffic. Sends location data to improve Maps accuracy. Toggle it off if you prefer not to share.
Everything else in System Services supports core iPhone functionality: emergency calls, time zone detection, compass calibration, Find My iPhone. Leave those enabled unless you have a specific reason to disable them.
Step 8: Identify Apps You've Forgotten About
As you walk through each permission category, you'll notice apps you don't remember installing. Old games, expired free trials, apps you downloaded once and never used again. These apps still have the permissions you granted months or years ago.
Make a list of unfamiliar apps as you review permissions. After you finish the audit, go to your home screen and search for each app on the list. If you don't recognize it, don't use it, or don't remember why you installed it, delete it.
To delete an app, press and hold its icon until a menu appears. Tap Remove App, then Delete App. This removes the app and all its data from your iPhone. It also revokes all permissions automatically.
If you're unsure whether you still need an app, don't delete it yet. Just revoke its permissions and see if you notice its absence over the next week. If you don't miss it, delete it.
Step 9: Set Defaults for Future App Installs
You've audited existing permissions. Now set up guardrails for new apps.
When you install a new app, it will prompt you for permissions as it needs them. The prompts appear in context: a photo editing app will ask for camera access the first time you try to take a picture within the app. A navigation app will ask for location access the first time you search for directions.
These prompts offer multiple options. For location, you'll see Never, Ask Next Time, While Using the App, and Always. For photos, you'll see Select Photos, Allow Access to All Photos, and Don't Allow. For most other permissions, you'll see Allow and Don't Allow.
Your default response should be the most restrictive option that still allows the app to function. For location, choose While Using the App unless the app explicitly requires background location. For photos, choose Select Photos unless the app needs to browse your entire library. For contacts, microphone, and camera, choose Don't Allow unless the app's core functionality depends on that permission.
You can always grant more access later if a feature doesn't work. It's harder to remember to revoke access after you've granted it.
What This Audit Actually Accomplishes
You've walked through every permission category, reviewed which apps have access, and revoked permissions that aren't necessary. What does this actually protect?
First, it reduces data exposure. Apps with location access know where you go. Apps with contact access know who you know. Apps with photo access see your images and their metadata. Apps with microphone access can record audio if compromised or poorly designed. Revoking unnecessary permissions limits what each app can see.
Second, it reduces battery drain. Apps with background location access run continuously. Apps with Bluetooth access scan for devices. Apps with motion tracking read sensor data. Fewer active permissions mean less background activity and longer battery life.
Third, it clarifies what you've actually agreed to. Most people grant permissions without tracking what they've approved. An audit brings that access back into conscious view. You now know which apps can see your location, read your contacts, and access your camera. That knowledge changes how you think about which apps to install and which features to use.
Fourth, it creates a baseline. You've reviewed permissions once. The next review will be faster because you'll recognize most of the apps and remember why you granted or denied access. You'll only need to evaluate new apps and apps whose permissions have changed.
How Often to Repeat This Audit
Review app permissions every few months. Set a recurring calendar reminder for once per quarter. The audit takes around 15 minutes after the first time because you're only evaluating new apps and checking whether anything has changed.
You should also review permissions immediately after:
- Installing several new apps in a short period
- Noticing unusual battery drain
- Seeing unexpected notifications from apps you rarely use
- Updating to a new version of iOS, which sometimes resets permission prompts
Permissions don't change on their own, but your app usage does. An app you installed for a specific project might still have location access months after you stopped using it. An app you thought you deleted might still be installed and running in the background. Regular audits catch these situations before they accumulate.
The One Permission You Should Always Deny
In The Fellowship of the Ring, Boromir reaches for the One Ring because he believes he can wield its power for good. Aragorn, who understands the Ring's nature, refuses to touch it. Boromir's confidence in his own judgment makes him vulnerable. Aragorn's refusal to engage with the temptation protects him.
App Tracking Transparency prompts work the same way. Apps ask to track your activity across other companies' apps and websites. The prompt frames tracking as a feature: "Allow tracking to receive personalized ads and support free content." The truth is simpler. Tracking enables ad targeting and cross-app data collection. It doesn't improve app functionality. It doesn't make the app work better. It extracts data for someone else's benefit.
The correct answer to every tracking prompt is Don't Allow. Always. No exceptions. If an app requires tracking permission to function, the app's business model depends on surveillance. Find a different app.
You can disable tracking prompts entirely. Go to Settings > Privacy & Security > Tracking. Toggle off Allow Apps to Request to Track. Apps will no longer be able to ask. They'll be denied automatically.
What Happens After You Revoke Permissions
You've revoked permissions for apps that don't need them. What breaks?
Most apps continue working with reduced permissions. A social media app without contact access will still let you post, browse, and message. You'll just have to search for friends manually instead of seeing automatic suggestions based on your contact list. A weather app without location access will still show weather forecasts. You'll just have to enter your location manually instead of having it detected automatically.
Some features will stop working entirely. A navigation app without location access cannot provide turn-by-turn directions. A video calling app without camera access cannot show your video feed. A voice memo app without microphone access cannot record audio. These failures are expected. The app will usually display an error message explaining that the feature requires a specific permission and offering a link to re-enable it in Settings.
If you revoke a permission and later realize you need it, you can restore it. Go to Settings > Privacy & Security, find the permission category, locate the app, and toggle it back on. The app will regain access immediately. No reinstallation required.
The goal isn't to disable every permission. The goal is to ensure that each app has only the permissions it actually needs. A fitness tracker should have location access. A flashlight app should not. A photo editing app should have camera access. A calculator should not. The audit brings those distinctions back into focus.
You've now walked through every permission category on your iPhone, reviewed which apps have access, and revoked permissions that aren't necessary. You know what each app can see. You've set a baseline for future reviews. And you've reduced the data exposure that accumulates when permissions go unexamined.
The process takes around 15 minutes. The result is a clearer picture of what you've actually agreed to share.